Hugo
1 整体流程回顾
基于 quickstart 初始化,创建 demo
- hugo 安装:
scoop search hugo
scoop install hugo hugo-extended
hugo version
Note: 虽然安装了
hugo-extended,但是后续使用还是直接使用hugo命令,这只是一个插件使用
- hugo 一键创建初始化网站:
hugo new site blxie.github.io
cd blxie.github.io
git init
## 添加主题
# git submodule add https://github.com/theNewDynamic/gohugo-theme-ananke.git themes/ananke
git submodule add https://github.com/HEIGE-PCloud/DoIt.git themes/DoIt
echo "theme = 'DoIt'" >> hugo.toml

hugo new content content/posts/my-first-post.md
hugo server
这里的 hugo.toml 非必须,hugo 会自动读取该项目下的 *.toml 或 config/_default/*.toml 配置文件!
.toml 配置文件是核心。
- 配置网站 将 DoIt 的主题配置应用到当前 blog,具体效果参考其 demosite,
(1)将 themes/DoIt/archetypes 下面的内容直接拷贝到自己网站下应用,不然不会成功应用 DoIt 的主题配置!覆盖 hugo new site 默认创建的配置。
(2)将 themes/DoIt/exampleSite/config 直接复制到创建的 项目的根目录,作为默认的配置,需要注意的是要修改里面的 github 链接,因为每一篇文档底部都有一些链接到自己的仓库的设置,可以直接查看源文件并编辑,查看提交信息和变化,提交 issues。具体做法:直接搜索 github.com/HEIGE-PCloud/DoIt 然后将其替换即可。
注意:修改之后不要着急 push,先在本地
hugo serve -e production --port 11234 --disableFastRender看看效果;同时,hugo new content dir1/dir2/xxx.md会默认以content为根目录,默认是drfat:true,所以直接部署时,会不显示!
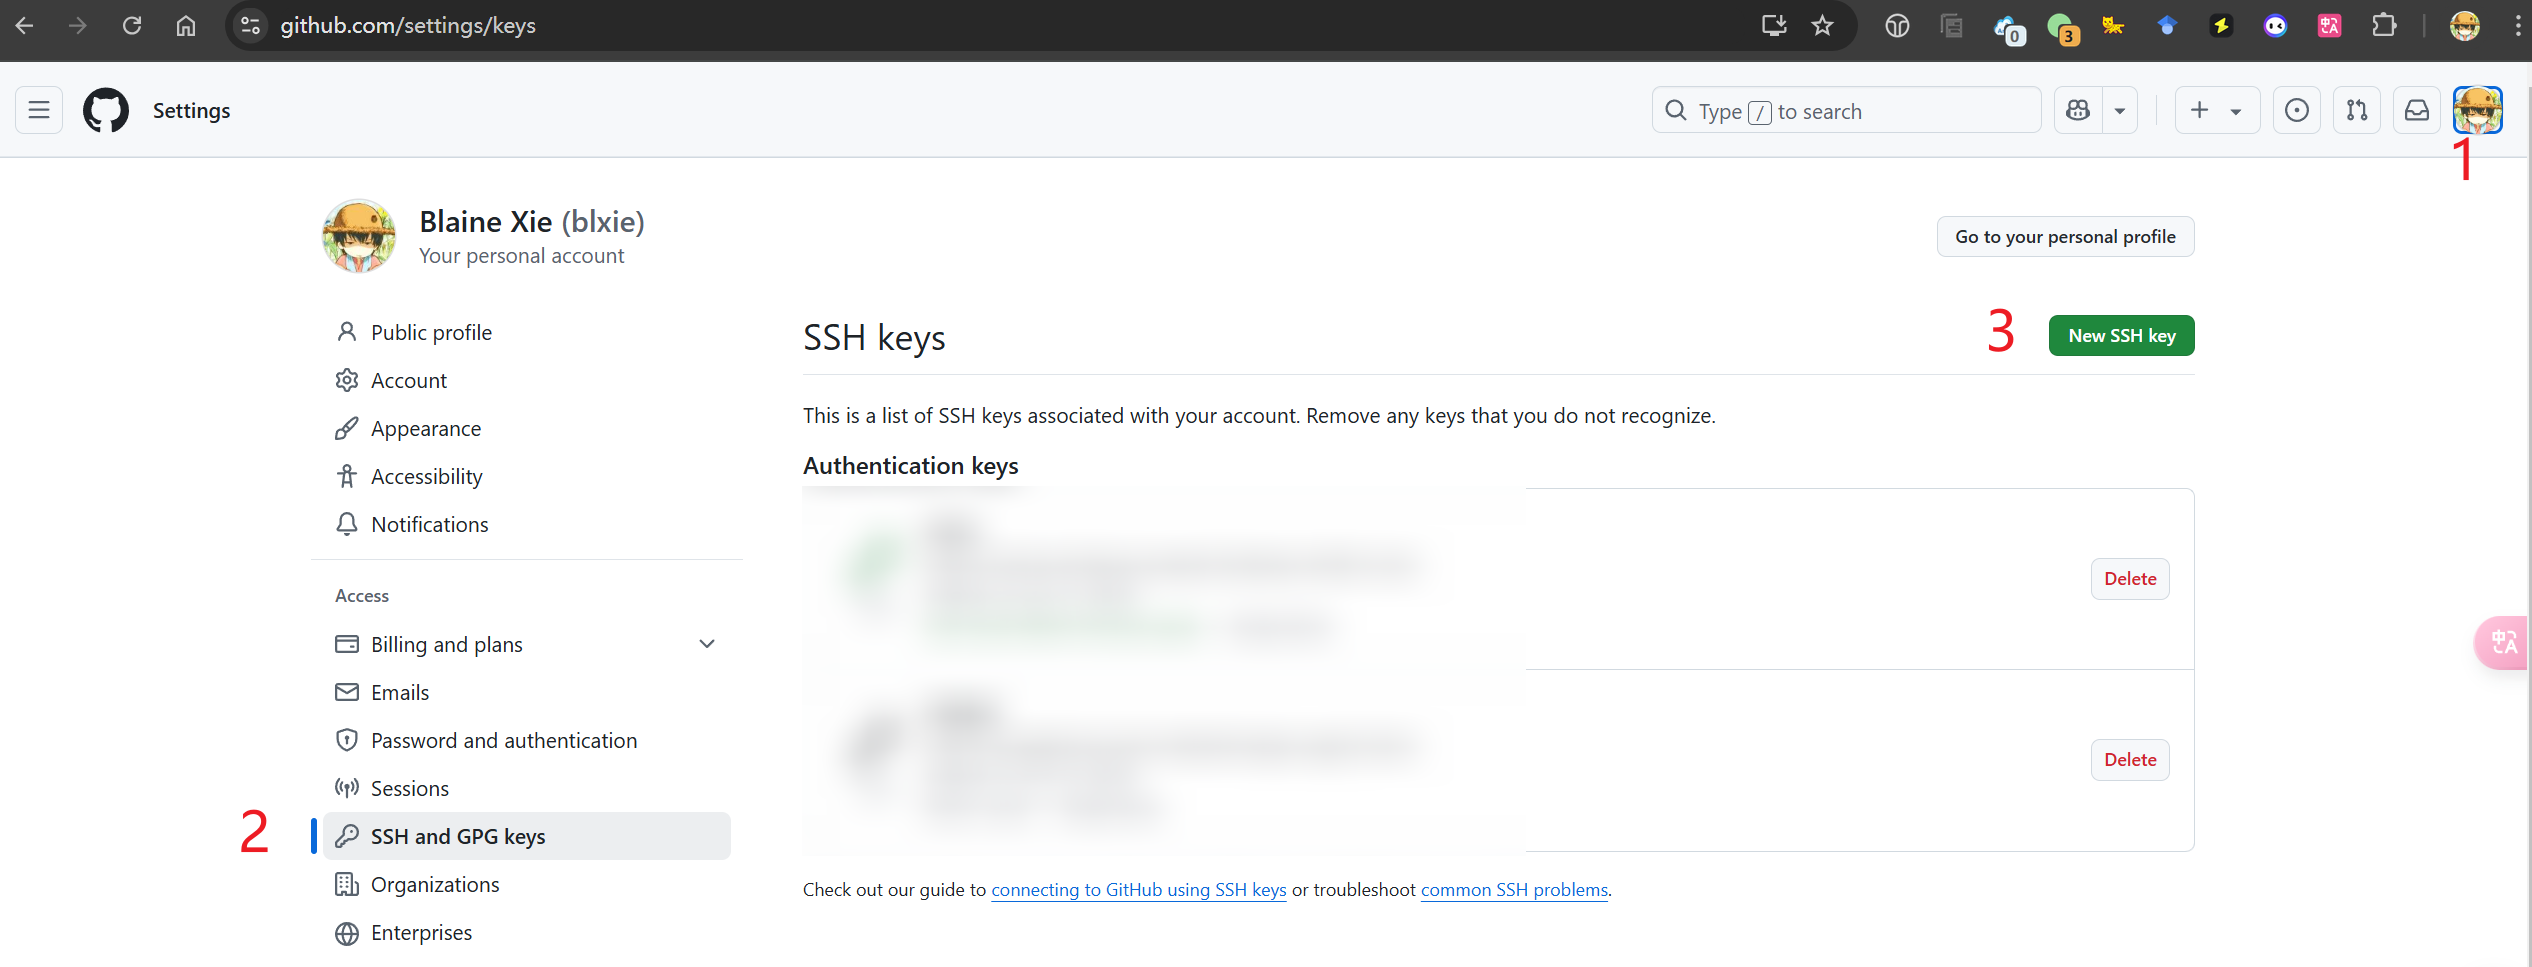
- 和 github 关联
(1)github 登录,新建一个
username.github.io的public网站 (2)关联到本地
git init
git remote add origin https://github.com/blxie/blxie.github.io.git
git branch -M main
# 配置用户名和邮箱
git config --global --user.name "blxie"
git config --global --user.name "blxie@outlook.com"
推荐使用 ssh 方式,不用每次提交都要确认身份:
git remote set-url origin git@github.com:blxie/blxie.github.io.git
# 编辑 ~/.ssh/config,添加
Host github.com
    Hostname ssh.github.com
    Port 443
ssh -T git@github.com

## 输入 yes 确认,后面通过 git push 的时候也要输入 yes
(3)配置 github action
提交的时候自动编译,不用将本地编译的文件传到 github,只保留核心的文档内容和配置,其他交给 github 即可。
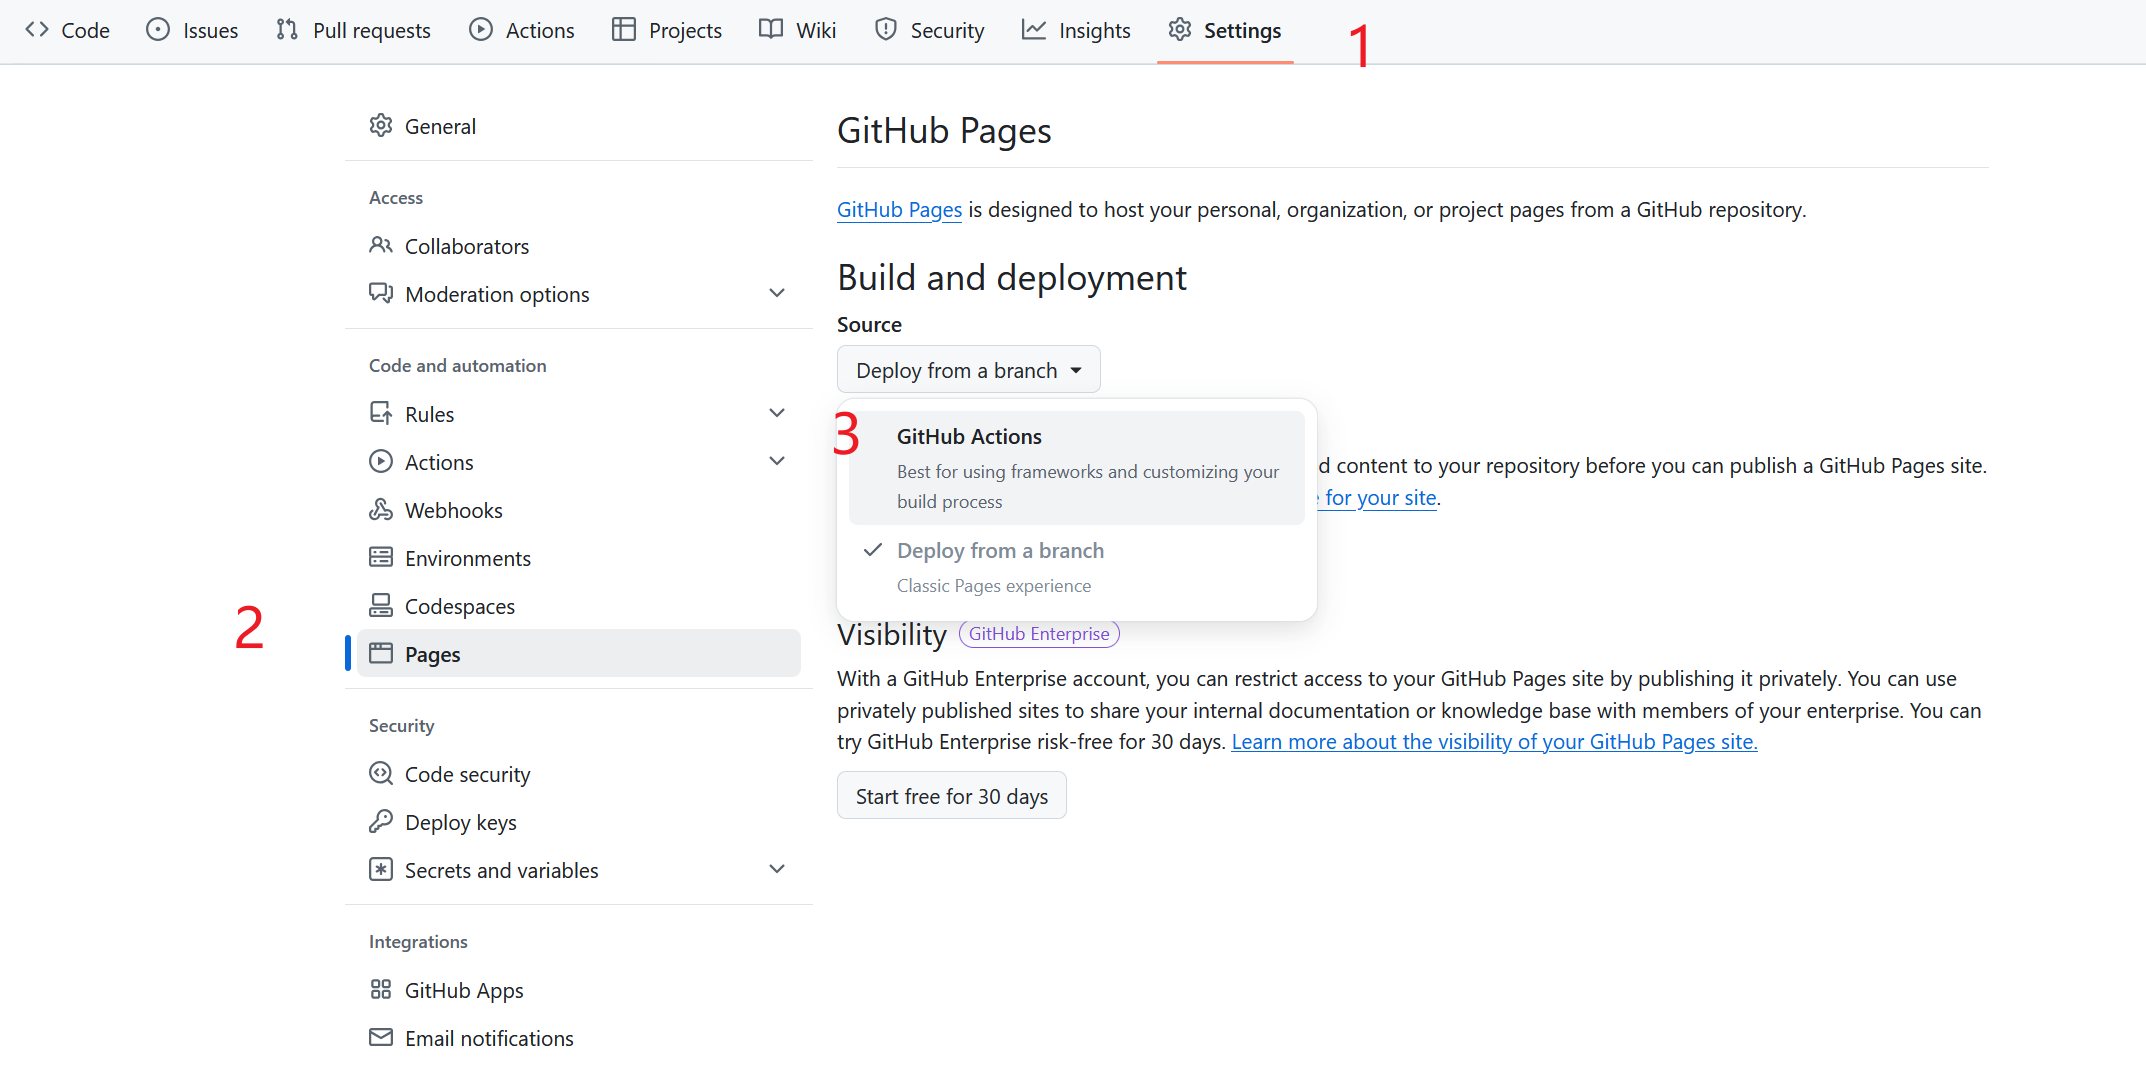
修改仓库配置,setting/Pages/Build and deployment 选择 GitHub Actions,这样提交的时候就会根据配置进行相应的操作了,具体来说就是编译发布。
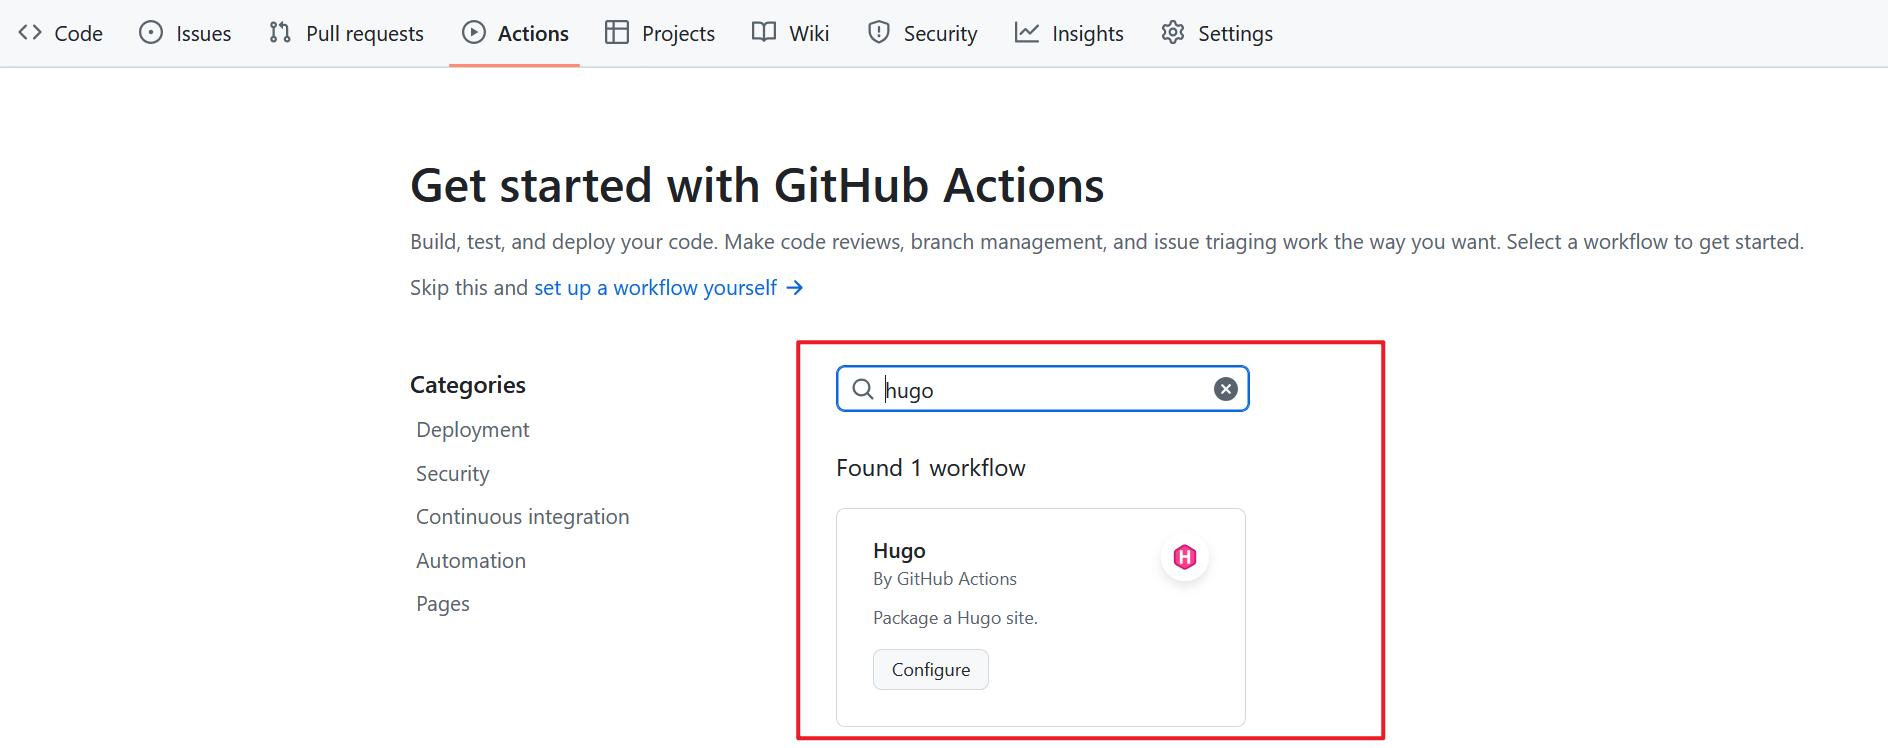
可以直接使用 hugo 官方提供的 Action 配置: .github/workflows/hugo.yaml
# 用于构建和部署Hugo网站到GitHub Pages的示例工作流程
name: 发布Hugo网站到Pages

on:
  # 在目标为默认分支的推送上运行
  push:
    branches:
      - main

  # 允许您手动从“Actions”标签运行此工作流程
  workflow_dispatch:

# 设置GITHUB_TOKEN的权限,以允许部署到GitHub Pages
permissions:
  contents: read
  pages: write
  id-token: write

# 仅允许一个并发部署,跳过在进行中的运行与最新排队的运行之间排队的运行。
# 但是,请不要取消进行中的运行,因为我们希望这些生产部署能够完成。
concurrency:
  group: "pages"
  cancel-in-progress: false

# 默认使用bash
defaults:
  run:
    shell: bash

jobs:
  # 构建作业
  build:
    runs-on: ubuntu-latest
    env:
      HUGO_VERSION: 0.120.2
    steps:
      - name: 安装Hugo CLI
        run: |
          wget -O ${{ runner.temp }}/hugo.deb https://github.com/gohugoio/hugo/releases/download/v${HUGO_VERSION}/hugo_extended_${HUGO_VERSION}_linux-amd64.deb \
          && sudo dpkg -i ${{ runner.temp }}/hugo.deb
      - name: 安装Dart Sass
        run: sudo snap install dart-sass
      - name: 检出
        uses: actions/checkout@v4
        with:
          submodules: recursive
          fetch-depth: 0
      - name: 设置Pages
        id: pages
        uses: actions/configure-pages@v3
      - name: 安装Node.js依赖
        run: "[[ -f package-lock.json || -f npm-shrinkwrap.json ]] && npm ci || true"
      - name: 使用Hugo构建
        env:
          # 为了与Hugo模块的最大向后兼容性
          HUGO_ENVIRONMENT: production
          HUGO_ENV: production
        run: |
          hugo \
            --gc \
            --minify \
            --baseURL "${{ steps.pages.outputs.base_url }}/"
      - name: 上传构建产物
        uses: actions/upload-pages-artifact@v2
        with:
          path: ./public

  # 部署作业
  deploy:
    environment:
      name: github-pages
      url: ${{ steps.deployment.outputs.page_url }}
    runs-on: ubuntu-latest
    needs: build
    steps:
      - name: 部署到GitHub Pages
        id: deployment
        uses: actions/deploy-pages@v2
刚发现可以直接用已有的 action:
(4)进行一系列的操作
git add .
git commit -m "xxx"
# git commit --amend
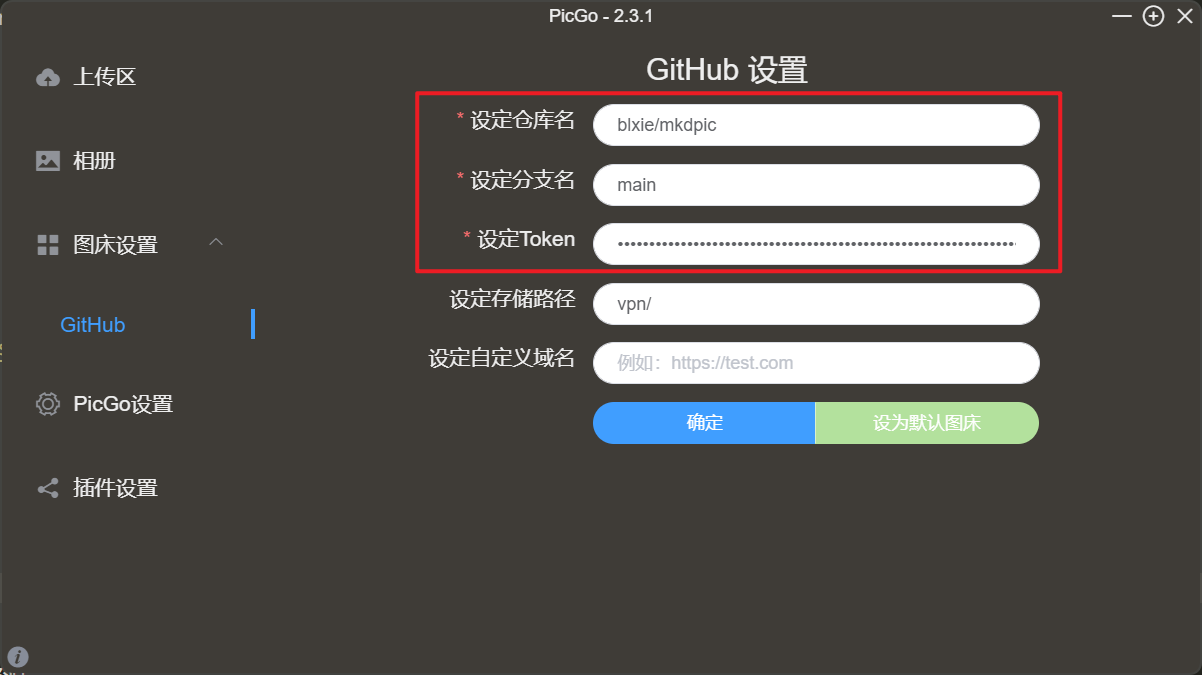
git push -u origin main(5)其他配置 和 PicGo 互联,基于 typora 编辑,PicGo 管理图片资源:
2 基于 docker(没必要)
docker run -it \
  --name hugo \
  -w /root \
  -v /home:/home \
  -p 1313:1313 \
  alpine:latest \
  sh

export http_proxy=http://172.23.240.1:10809
export https_proxy=$http_proxy
apk add --no-cache --repository=https://dl-cdn.alpinelinux.org/alpine/edge/community hugo

docker commit hugo hugo:latest
docker rm hugo
docker run -it \
  --name hugo \
  -w /root \
  -v /home:/home \
  -p 1313:1313 \
  hugo:latest \
  sh

# hugo 监听所有网络接口
hugo server --bind=0.0.0.0 --baseURL=http://localhost:1313
3 总结
- 利用教程做基础的搭建配置
- 使用 GitHub Action 自动化任务
- 根据 DoIt 主题拷贝配置,定制化博客布局,主要是
archetype, config/_default/*.toml配置文件
期间有一些小 bug,根据官方的示例文档来操作即可(hugo & DoIt),文档很丰富,也可以参考其他优秀的博客的 GitHub 布局。
4 参考文档
- DoIt 官方说明文档
- ryan4yin 大佬的博客,可以看 github 仓具体内容布局如何设置
- 另外一篇可以简单参考的 hugo 搭建博客
- 可以看一下的篇2
- DoIt 官方 github
- hugo 整体搭建流程简要参考
基于下面的参考,搭建:
- 官方 quickstart 必不可少,基于此创建的我的博客
- hugo 安装,windows 首先采用 scoop 安装
- github action 自动化部署必不可少!
- DoIt 官方教程
- 注意安装
hugo & hugo-extended,以支持更丰富的样式布局
- 注意安装
- 官方的 configuration,没具体细看,还未有配置