Nvim
neovim
系列 - How-to-Nvim
目录
1 最新 lazyvim
基于 neovim,因此要先安装 neovim,lazyvim 相当于一个插件,最后启动还是 nvim 命令,
2 常用的快捷键
以下所有的字母大小写要区分!
w直接可以按照单词向下跳转ctrl w然后执行下面的操作即可切换窗口- 方向键,切换到对应窗口(常用)
- 也可以用
h j k l组合切换,根据习惯使用 - 更多功能参考菜单提示操作
L打开的文件切换: term zsh/bash打开新的终端 Terminal 并执行携带的命令- 如果是
zsh/bash,可以保留当前 Terminali/a激活当前 Terminal,之后可以执行各种命令Esc Esc(按两次ESC) Terminal模式 切换到 NORMAL模式
- 各个终端只能继承最开始的 Terminal 的环境变量,打开的之间不共享环境变量,且打开的都不继承最开始的 term 的 conda 环境,只能手动激活
- 如果是
ctrl l也能打开一个终端,再次执行可隐藏,但是命令会在后台继续执行<leader> b(b 表示 buffer)列出对 buffer 的各种操作,buffer 对应打开的各个文件<leader> bd删除,后续的省略写<leader>,但是要有该操作!,列出所有的 buffer,还可以预览、搜索
终端窗口中:
LazyExtras安装额外的插件,x选中,自动安装各种语言
yanky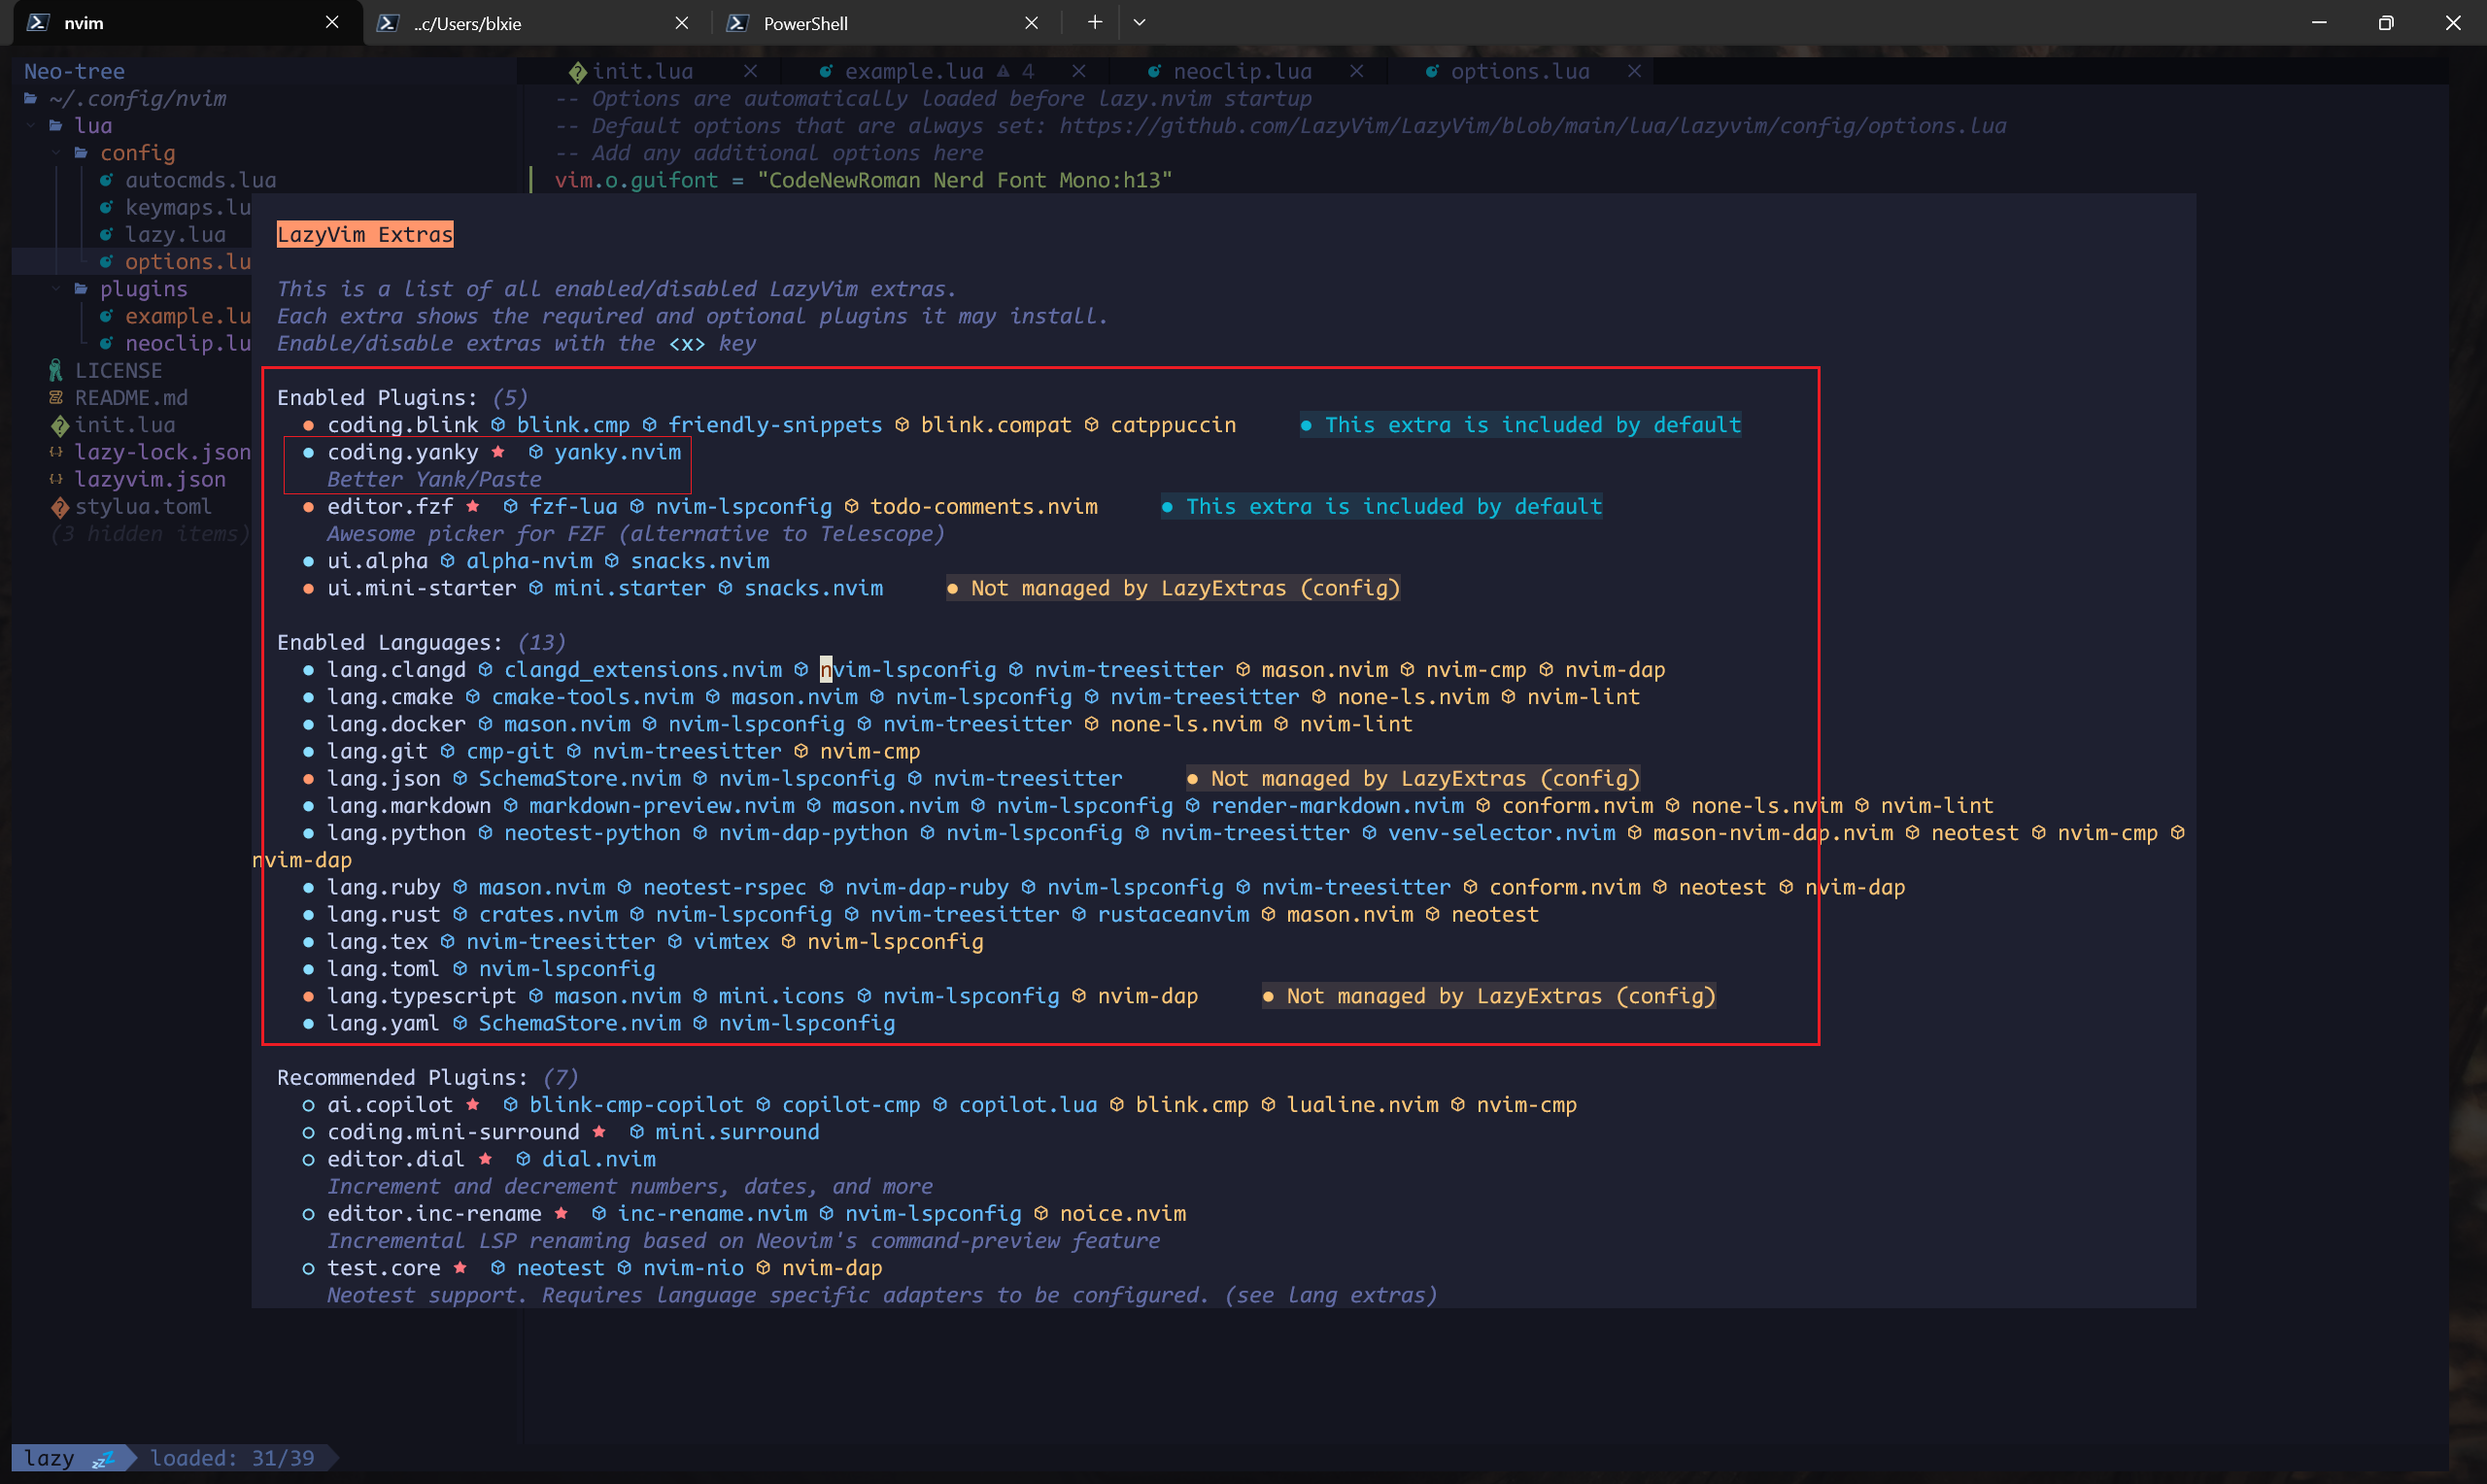
3 docker 安装搭建
使用 docker 安装搭建,服务端以服务的形式启动,本地使用 neovide 连接
3.1 证书问题(基础环境设置)
export http_proxy=http://172.23.240.1:10809
export https_proxy=$http_proxy
echo "insecure" > ~/.curlrc

cp /usr/share/zoneinfo/Asia/Shanghai /etc/localtime
git config --global http.sslVerify false

apt --fix-broken install
export DEBIAN_FRONTEND=noninteractive
apt update
apt install ca-certificates -y
update-ca-certificates
apt install vim -y
3.2 换源(先更新证书后换源)
mv /etc/apt/sources.list.d/ubuntu.sources /etc/apt/sources.list.d/ubuntu.sources.bak

cat <<EOF | tee /etc/apt/sources.list.d/ubuntu.sources
Types: deb
URIs: https://mirrors.tuna.tsinghua.edu.cn/ubuntu
Suites: noble noble-updates noble-backports
Components: main restricted universe multiverse
Signed-By: /usr/share/keyrings/ubuntu-archive-keyring.gpg

Types: deb
URIs: http://security.ubuntu.com/ubuntu/
Suites: noble-security
Components: main restricted universe multiverse
Signed-By: /usr/share/keyrings/ubuntu-archive-keyring.gpg
EOF

apt update
3.3 host docker 安装
apt update
apt install ca-certificates vim zsh docker-compose -y

### docker 代理设置
mkdir -p /etc/systemd/system/docker.service.d
vim /etc/systemd/system/docker.service.d/http-proxy.conf
[Service]
Environment=http_proxy=http://172.23.240.1:10809
Environment=no_proxy=localhost,127.0.0.1
Environment=https_proxy=http://172.23.240.1:10809
systemctl daemon-reload
systemctl restart docker
3.4 oh-my-zsh
oh-my-zsh 参考:https://www.haoyep.com/posts/zsh-config-oh-my-zsh/
export http_proxy=http://172.23.240.1:10809
export https_proxy=$http_proxy

sh -c "$(curl -fsSL https://raw.githubusercontent.com/ohmyzsh/ohmyzsh/master/tools/install.sh)"
git clone https://github.com/zsh-users/zsh-autosuggestions ${ZSH_CUSTOM:-~/.oh-my-zsh/custom}/plugins/zsh-autosuggestions
git clone https://github.com/zsh-users/zsh-syntax-highlighting.git ${ZSH_CUSTOM:-~/.oh-my-zsh/custom}/plugins/zsh-syntax-highlighting
sed -i 's/^plugins=.*/plugins=(git zsh-autosuggestions zsh-syntax-highlighting z extract)/' ~/.zshrc
usermod -s /bin/zsh $(whoami)
echo -e "export http_proxy=http://172.23.240.1:10809\nexport https_proxy=\$http_proxy" | tee -a ~/.zshrc

git clone --depth=1 https://github.com/romkatv/powerlevel10k.git ${ZSH_CUSTOM:-$HOME/.oh-my-zsh/custom}/themes/powerlevel10k
vim ~/.zshrc
ZSH_THEME="powerlevel10k/powerlevel10k"
plugins=(git zsh-autosuggestions zsh-syntax-highlighting z extract)
p10k configure
3.5 nvm 安装 npm nodejs
curl -o- https://raw.githubusercontent.com/nvm-sh/nvm/v0.39.5/install.sh | bash
export NVM_DIR="$HOME/.nvm"
[ -s "$NVM_DIR/nvm.sh" ] && \. "$NVM_DIR/nvm.sh"  # This loads nvm
[ -s "$NVM_DIR/bash_completion" ] && \. "$NVM_DIR/bash_completion"  # This loads nvm bash_completion
## 安装 Node.js 和 npm
nvm install --lts
node -v;npm -v
3.6 miniconda3
### conda
mkdir -p ~/miniconda3
wget https://repo.anaconda.com/miniconda/Miniconda3-latest-Linux-x86_64.sh -O ~/miniconda3/miniconda.sh
bash ~/miniconda3/miniconda.sh -b -u -p ~/miniconda3
~/miniconda3/bin/conda init bash
~/miniconda3/bin/conda init zsh
3.7 nvim 镜像创建
## 1. 使用 lazygit 推荐的 alpine 镜像
# rm 临时使用
docker run -it --rm -v /home:/home --user root neovim:v0.1 bash
docker run -it \
  --name nvim \
  -w /root \
  -v /home:/home \
  -p 7894:7894 \
  alpine:latest \
  sh

apk add git lazygit fzf curl neovim ripgrep alpine-sdk npm python3 bash tmux zsh shadow vim tzdata --update## 2. 使用 ubuntu 镜像
# docker pull ubuntu
docker run -it \
--name nvim \
-w /root \
-v /home:/home \
-p 7894:7894 \
ubuntu:latest \
bash
### nvim 相关环境
apt update && apt install \
curl vim git tmux zsh wget unzip \
build-essential pkg-config ninja-build libssl-dev libssl-dev \
fzf ripgrep yq jq luarocks locales
## 配置编码
dpkg-reconfigure locales
vim ~/.zshrc
area="en_US"
area="zh_CN"
export LANG=$area.UTF-8
export LC_ALL=$LANG
## rustc
curl --proto '=https' --tlsv1.2 -sSf https://sh.rustup.rs | sh
rustup update
rustc --version
LAZYGIT_VERSION=$(curl -s "https://api.github.com/repos/jesseduffield/lazygit/releases/latest" | \grep -Po '"tag_name": *"v\K[^"]*')
curl -Lo lazygit.tar.gz "https://github.com/jesseduffield/lazygit/releases/download/v${LAZYGIT_VERSION}/lazygit_${LAZYGIT_VERSION}_Linux_x86_64.tar.gz"
tar xf lazygit.tar.gz lazygit
install lazygit -D -t /usr/local/bin/
rm -f lazygit*
curl -kLOC - https://github.com/neovim/neovim/releases/download/stable/nvim-linux64.tar.gz
tar -zxvf nvim-linux64.tar.gz -C /opt && rm -f *tar.gz
ln -s /opt/nvim-linux64/bin/nvim /usr/local/bin/nvim
git clone https://github.com/LazyVim/starter ~/.config/nvim
mkdir -p /usr/local/Ascend4 配置文件
文件夹目录,
/root/.config/
├── lazygit
│   └── config.yml
└── nvim
    ├── init.lua
    ├── lazy-lock.json
    ├── lazyvim.json
    ├── LICENSE
    ├── lua
    │   ├── config
    │   │   ├── autocmds.lua
    │   │   ├── keymaps.lua
    │   │   ├── lazy.lua
    │   │   └── options.lua
    │   └── plugins
    │       ├── example.lua
    │       └── neoclip.lua
    ├── README.md
    └── stylua.toml
~/.config/nvim/lua/config/options.lua
vim.o.guifont = "CodeNewRoman Nerd Font Mono:h13"
vim.opt.linespace = 0
vim.g.neovide_scale_factor = 1.0
vim.g.neovide_padding_top = 0
vim.g.neovide_padding_bottom = 0
vim.g.neovide_padding_right = 0
vim.g.neovide_padding_left = 0
~/.config/nvim/lua/plugins/example.lua
-- 注释
-- if true then return {} end

-- 可以在这里加上主题文件等 github.nvim
~/.config/nvim/lua/plugins/neoclip.lua
return {
  "AckslD/nvim-neoclip.lua",
  dependencies = {
    -- you'll need at least one of these
    { "nvim-telescope/telescope.nvim" },
    { "ibhagwan/fzf-lua" },
  },
  config = function()
    require("neoclip").setup()
  end,
}
conform.nvim
4.1 打包提交
# 可以直接覆盖提交
docker commit nvim neovim:latest

docker run -d \
  --name nvim-daemon \
  -w /root \
  -v /:/host \
  -p 7894:7894 \
  --restart always \
  nvim:v0.1 \
  nvim --headless --listen 0.0.0.0:7894

  # 如果需要修改
  docker exec -it nvim-service bash
  docker run -itu root --name neovim nvim:latest zsh
  ## 导出: D:\Installers\Dev
  docker save -o neovim-docker.tar neovim:latest
  ## 导入
  docker load -i neovim-server.tar
  ## docker-compose
docker-compose up -ddocker-compose.yml【必须是这个名字】
使用 Docker 卷共享 /usr/local/Ascend(可行,但是要提前创建好文件夹目录,可以删除自定义 network)
## 这里的版本指的是使用哪个 base 的 yml,默认使用最新的
# version: "3.8"

services:
  nvim:
    image: neovim:latest
    container_name: nvim-server
    volumes:
      - /home:/home
      - ascend-data:/usr/local/Ascend  # 挂载共享卷到 nvim-daemon
    ports:
      - "7894:7894"
    networks:
      - if0
    environment:
      - TZ=Asia/Shanghai  # 设置时区为中国上海
      - PATH=/opt/nvim-linux64/bin:$PATH  # 将 /opt/nvim-linux64/bin 添加到 PATH
    command: nvim --headless --listen 0.0.0.0:7894
    restart: always

  ubuntu:
    image: ubuntu:latest
    container_name: ucase1
    volumes:
      - /home:/home
      - ascend-data:/usr/local/Ascend  # 挂载共享卷到 ucase1
    networks:
      - if0
    environment:
      - TZ=Asia/Shanghai  # 设置时区为中国上海
    depends_on:
      - nvim
    command: sleep infinity

networks:
  if0:
    driver: bridge

volumes:
  ascend-data:  # 定义共享卷
完善网络部分,
## 这里的版本指的是使用哪个 base 的 yml,默认使用最新的
# version: "3.8"

services:
  nvim:
    image: blainetx/neovim:latest
    container_name: nvim-server
    network_mode: host
    volumes:
      - /home:/home
      - /root/workspace:/workspace
      - ascend-data:/usr/local/Ascend  # 挂载共享卷到 nvim-daemon
    environment:
      - TZ=Asia/Shanghai  # 设置时区为中国上海
      - PATH=/opt/nvim-linux64/bin:$PATH  # 将 /opt/nvim-linux64/bin 添加到 PATH
      - HTTP_PROXY=$http_proxy
      - http_proxy=$http_proxy
      - HTTPS_PROXY=$http_proxy
      - https_proxy=$http_proxy
    command: nvim --headless --listen 0.0.0.0:7894
    restart: always

volumes:
  ascend-data:  # 定义共享卷
4.2 使用方法
# 服务端
nvim --headless --listen 0.0.0.0:7894

# windows 主机:注意使用的是 localhost,而不是 wsl 的 IP!
telnet localhost 7894 # 先检查是否可通
neovide.exe --remote-tcp=localhost:7894
docker 方法的话,直接客户端 neovide 按照上面的管理即可。
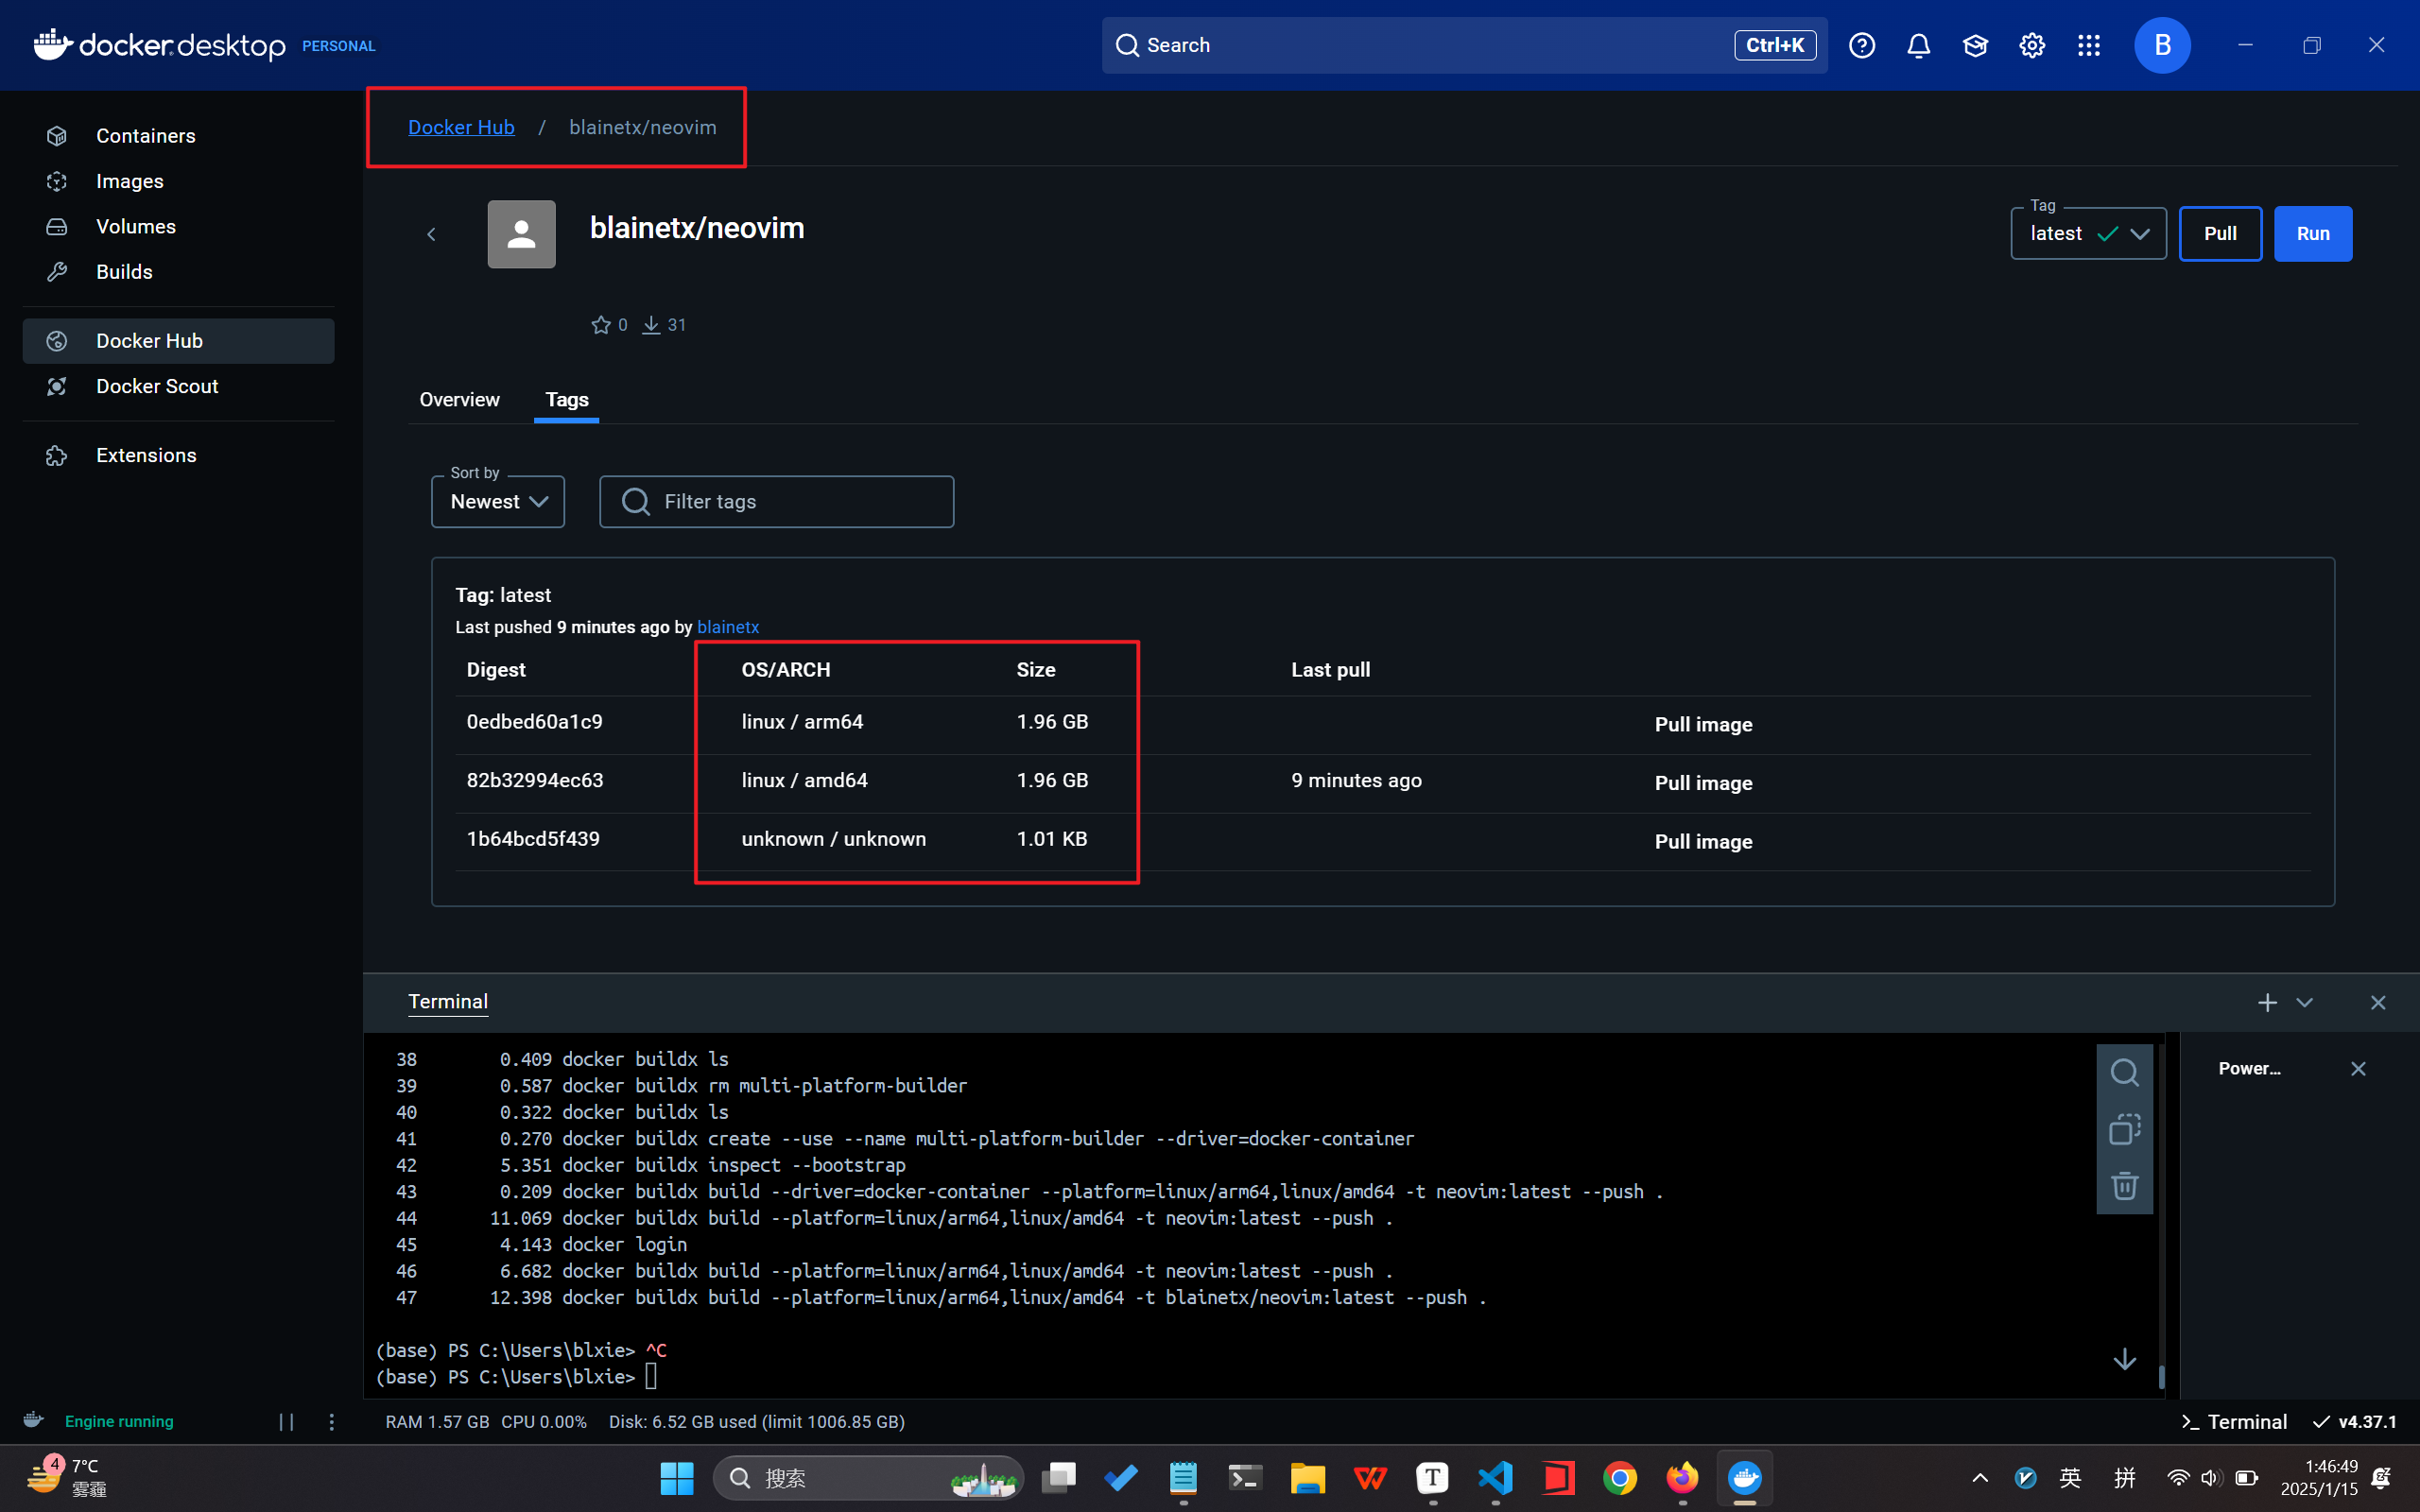
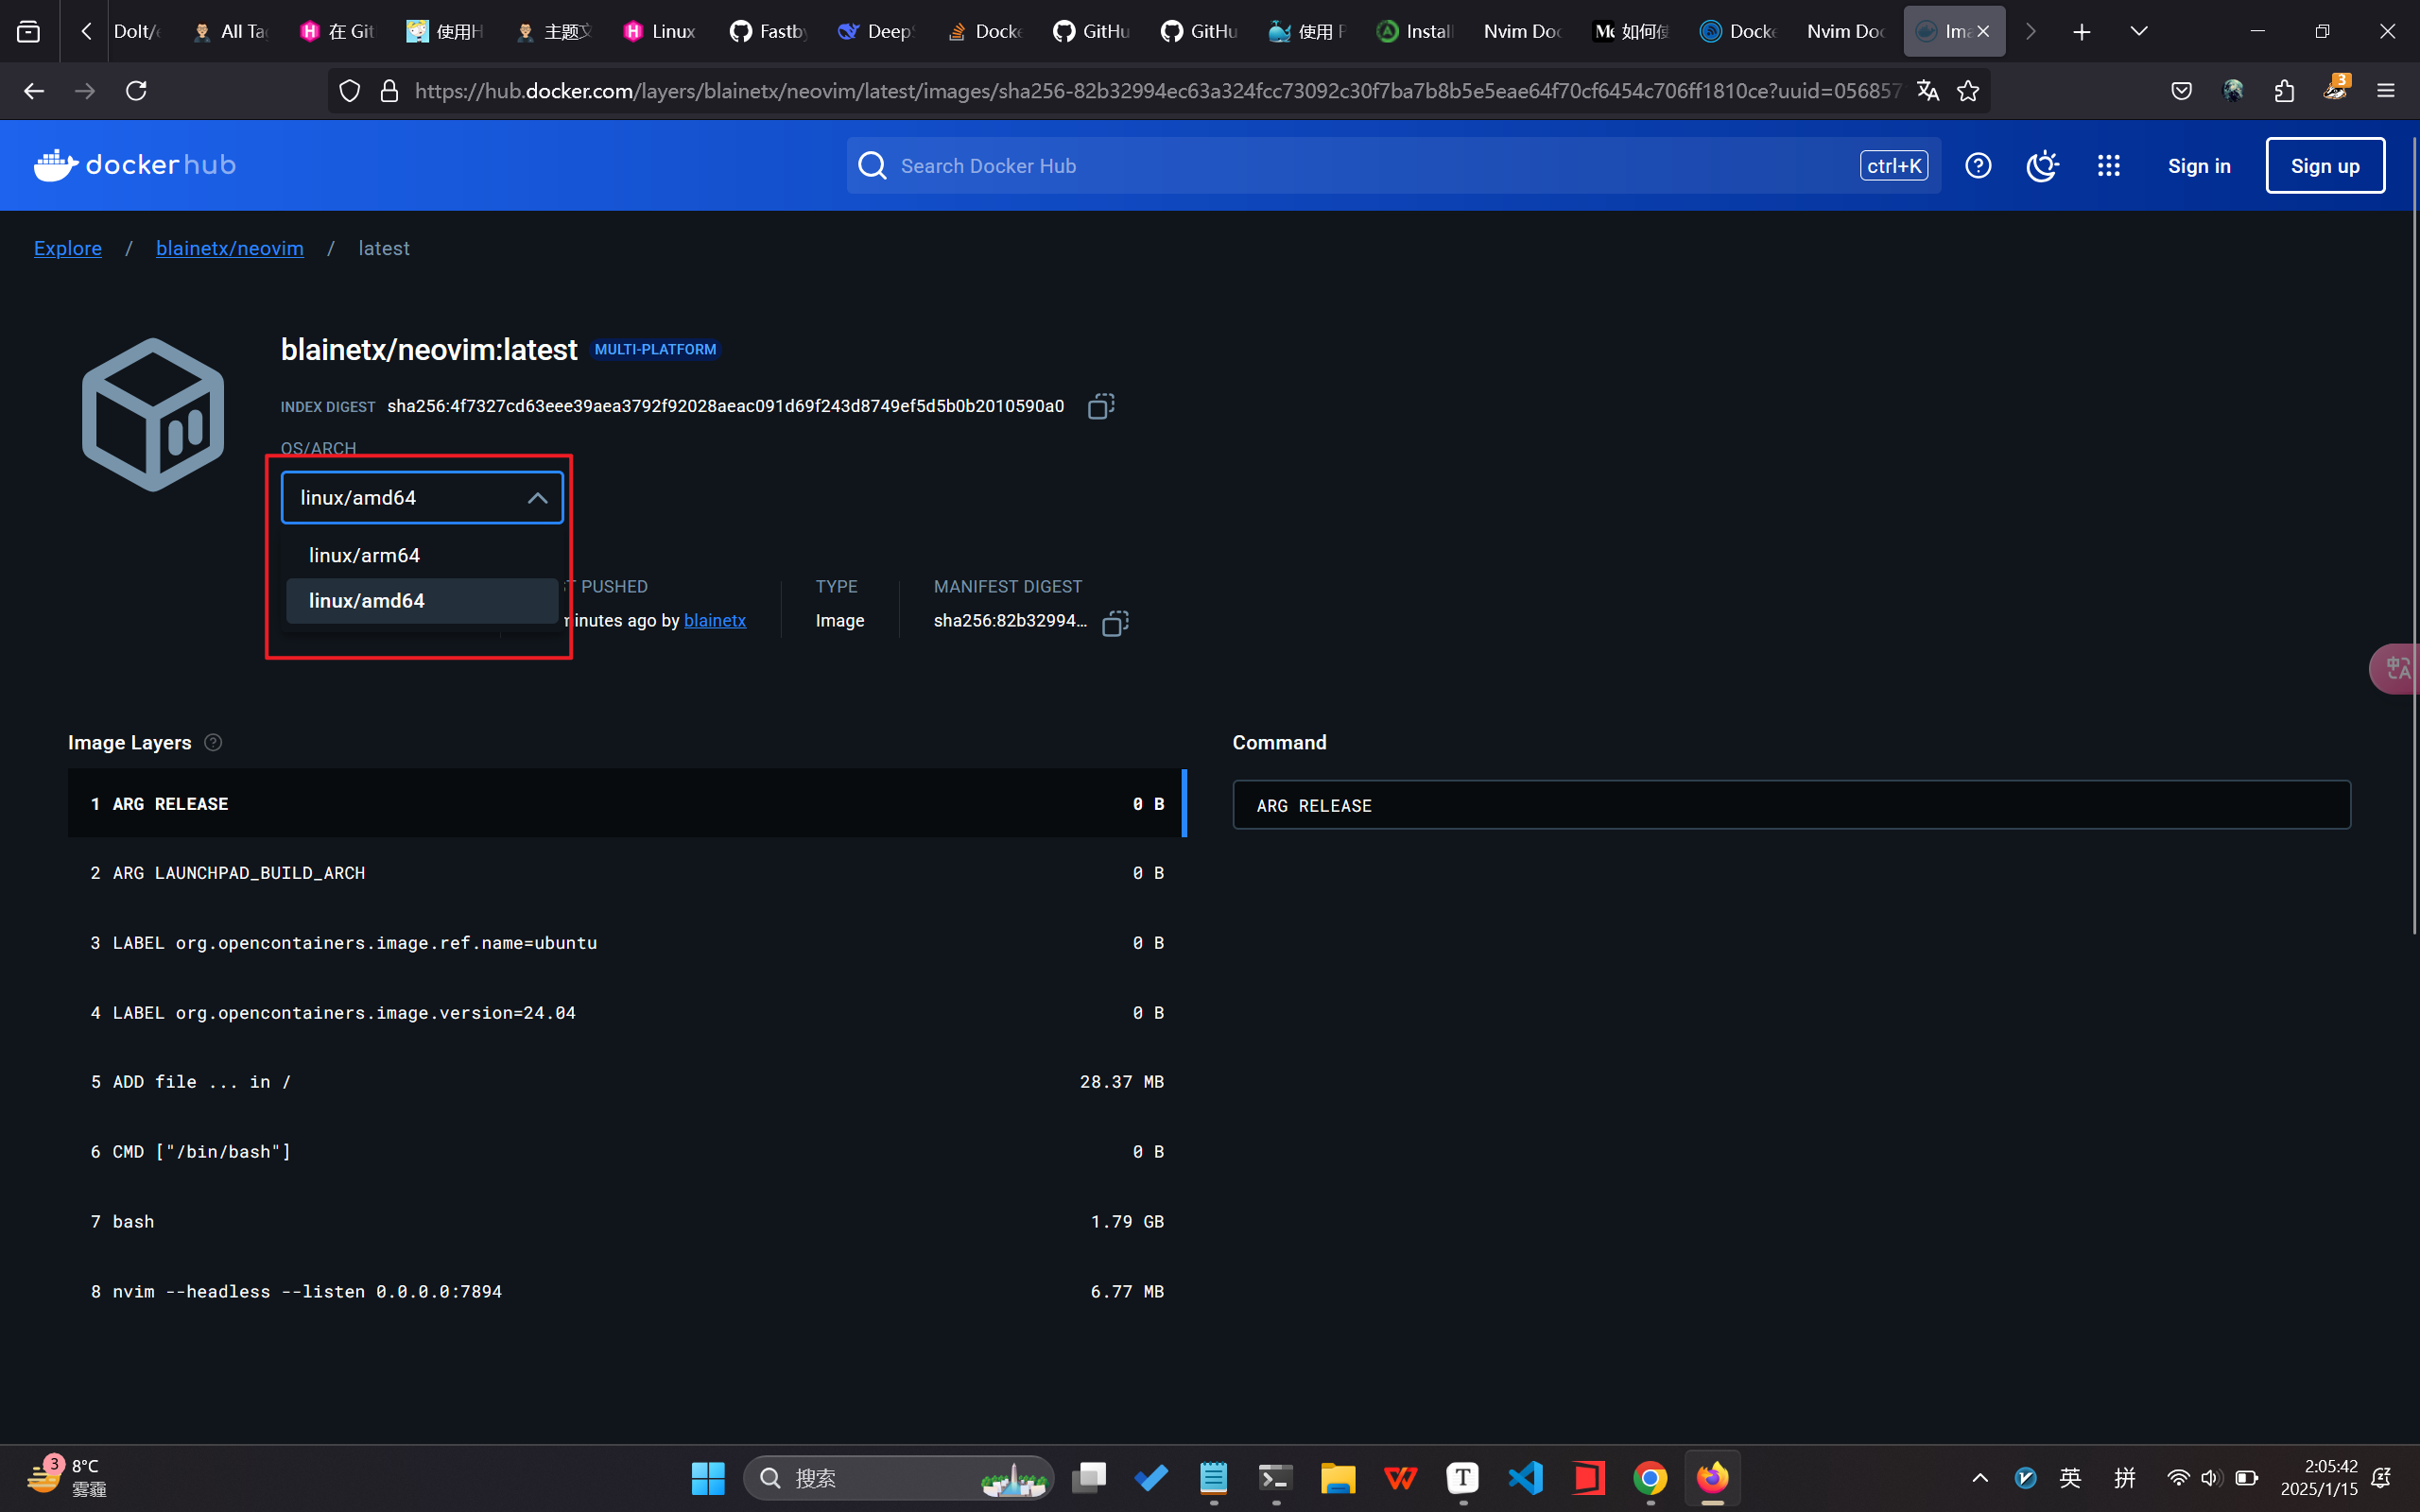
4.3 docker 多平台构建
基于 docker-buildx,
Linux 环境下面提交一直有问题,最终通过 Docker desktop 解决,利用 其自带的环境在命令行里实现多平台的打包提交,
docker buildx create --use --name multi-platform-builder --driver=docker-container
docker buildx inspect --bootstrap
docker buildx ls/rm
## 正常创建 Dockerfile
FROM blainetx/neovim:latest
docker buildx build --platform=linux/arm64,linux/amd64 -t blainetx/neovim:latest --push .

## --load . 会加载存放在本地,只能和机器架构对应
## --push . 直接构建推送到远端,不存在该问题!所以不使用 --load .
docker buildx build --platform linux/arm64 -t nvim:arm64 --load .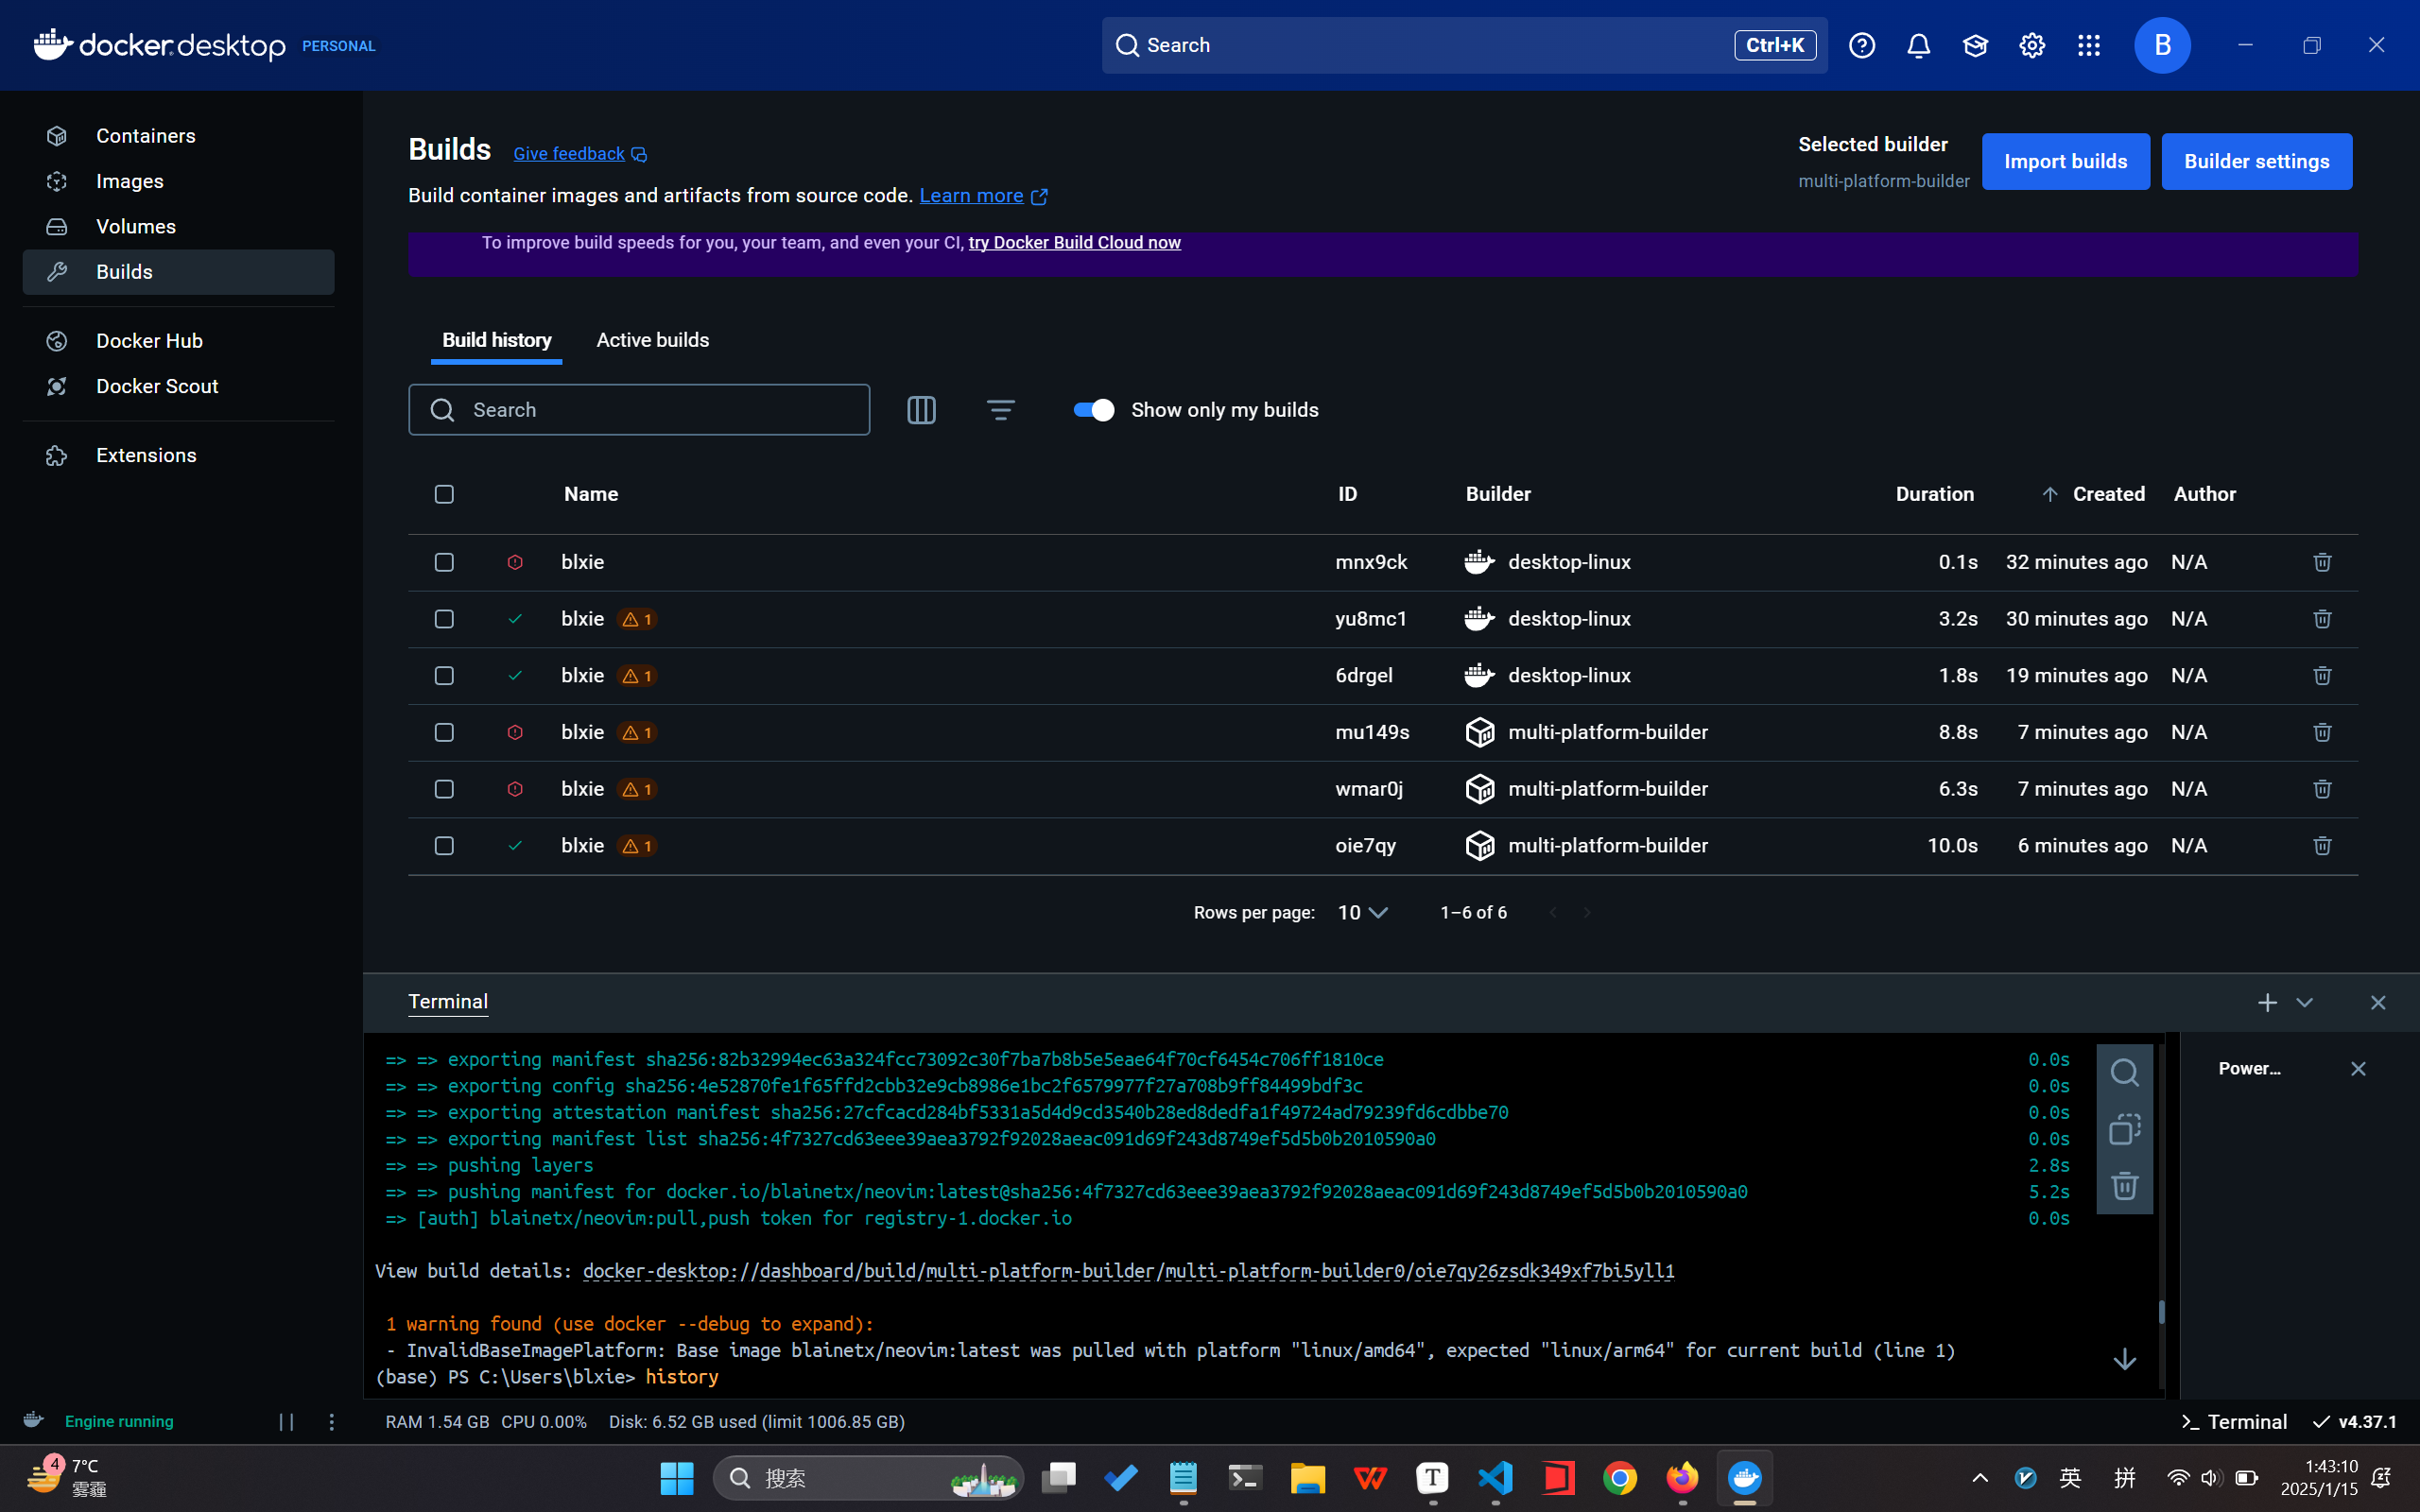
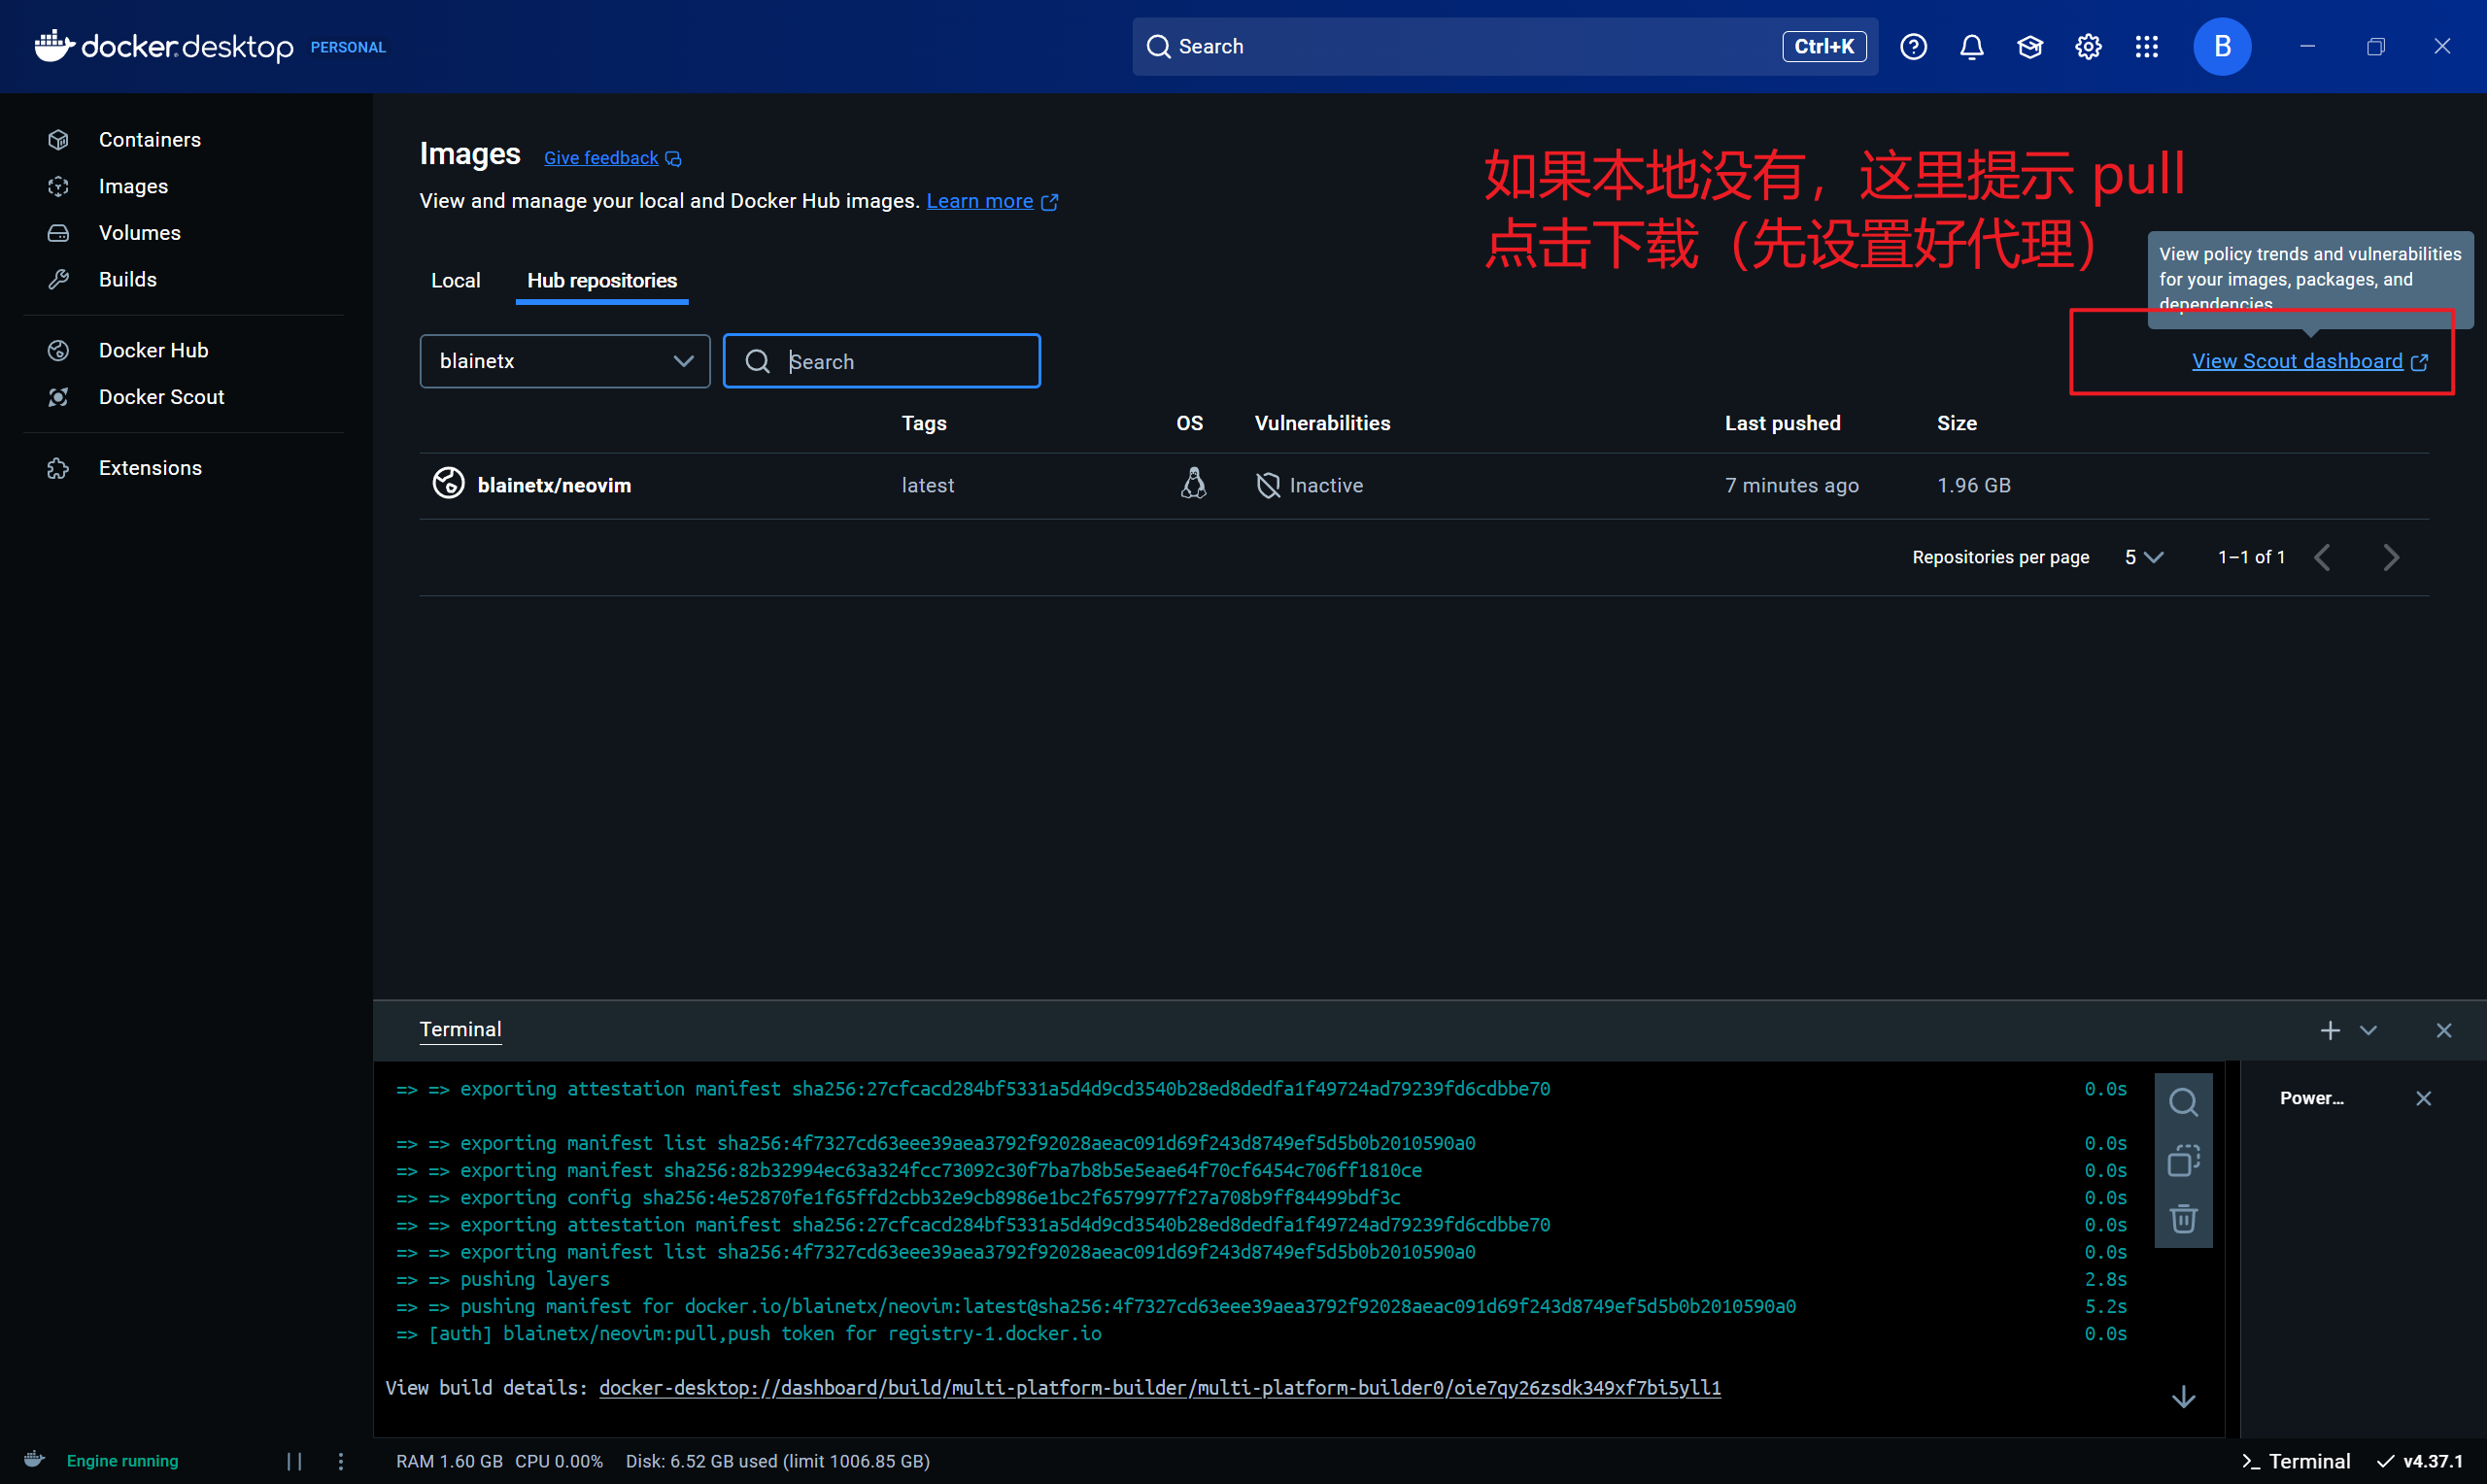
检查是否 push 成功: